How to Plan a Content Calendar for Your Blog
Whether you’re a full-time blogger or you maintain a blog for your business website (a great way to grow your audience & SEO!), a content calendar is a helpful way to strategically plan and organize your blog content.
Managing your blog via a content calendar also helps to keep track of topic ideas, ensure regular and timely posting, coordinate authors and guest posts, and ensure your blog is built to promote your business and brand.
What to include in your blog content calendar
Though your specific needs may vary by your industry, niche, or business model, there are a few general content calendar elements that are helpful to include for most blogs:
Topic ideas
Blog categories
Publication date
Workflow status
Related offers or promotions
Notes
This post contains affiliate links through which I may earn a commission if you choose to purchase, at no additional cost to you. As always, these are products or services I personally use & love!
Why I use Airtable for my content calendar
I use Airtable to build and manage my content calendars (for multiple blogs!) because it’s both a simple and robust tool to organize content and view it in multiple layouts.
Here are some of the Airtable features I use and love:
sort + organize tables by content
pull and reference content across tables
list, calendar + Kanban views
color coding for organization and “at-a-glance” snapshots
Below I’ll walk through exactly how I set up my Airtable content calendar, and you can even copy this exact template and use it for your own blog!
If you don’t have an Airtable account yet, here’s how to get one to use the template (it’s free—woohoo!):
Though Airtable does offer a free plan, I personally enjoy the additional formatting options of the Pro plan. (You’ll need it to add some color, which you’ll see below!)
How to set up a content calendar with Airtable
This is exactly how I set up our blog content calendar and marketing plan in Airtable.
Feel free to copy the template below, which I’ve already set up for you to build your own blog calendar within. (Click the “Copy base” link on the bottom right.)
The template is highly editable, so you can adjust labels and content to work for your specific business needs.
Here are the steps you’ll follow to either create your own Airtable content calendar, or work within our template:
1. Create your content calendar fields
First, I work in “grid view” to set up the fields we’d like the table to include.
Here’s what you’ll see included in the Blog tab of our content calendar template (the field type for each item is noted in italics):
TITLE: This could be either the title of your post, or a general topic area. It could also be separated into two different fields, like Headline & Sub-Head. Single line text
CATEGORY: Denote the blog category for each post. Single select
DATE: This is where you’ll assign the date that’s used on the calendar view. Records without dates will show up in a list of “available post ideas.” Date
STATUS: Allows you to track and sort by projects based on their workflow status—for example, “concept,” “in queue,” “scheduled,” “published,” etc. Single select
AUTHOR: If you publish blog posts by multiple authors, you can also create a field for author names. Single select (or Collaborator if they have access to the Airtable)
PROMOTIONS: It’s a great idea to include some type of additional offer or promotion in each blog post, letting readers know how they can get more of what they like. This field allows you outline the specific offers you’d like to include in each post. Multiple select
NOTES: Compile any notes to yourself regarding the post. Long text
UPDATES: If your blog posts are intended to be evergreen content, you may need to make occasional updates to keep the content up-to-date and accurate. This field serves as an easy place for you to keep track of any updates needed. Long text
(You can ignore the “Newsletter” and “Social Media” tabs in the template for now, as those will be added in a later step.)
2. Organize your content calendar view
Next, I set up the calendar view and how I’d like our content to be displayed here.
Switch over to the calendar view via the arrow on the upper left of your screen, which is where you’ll toggle between layout views.
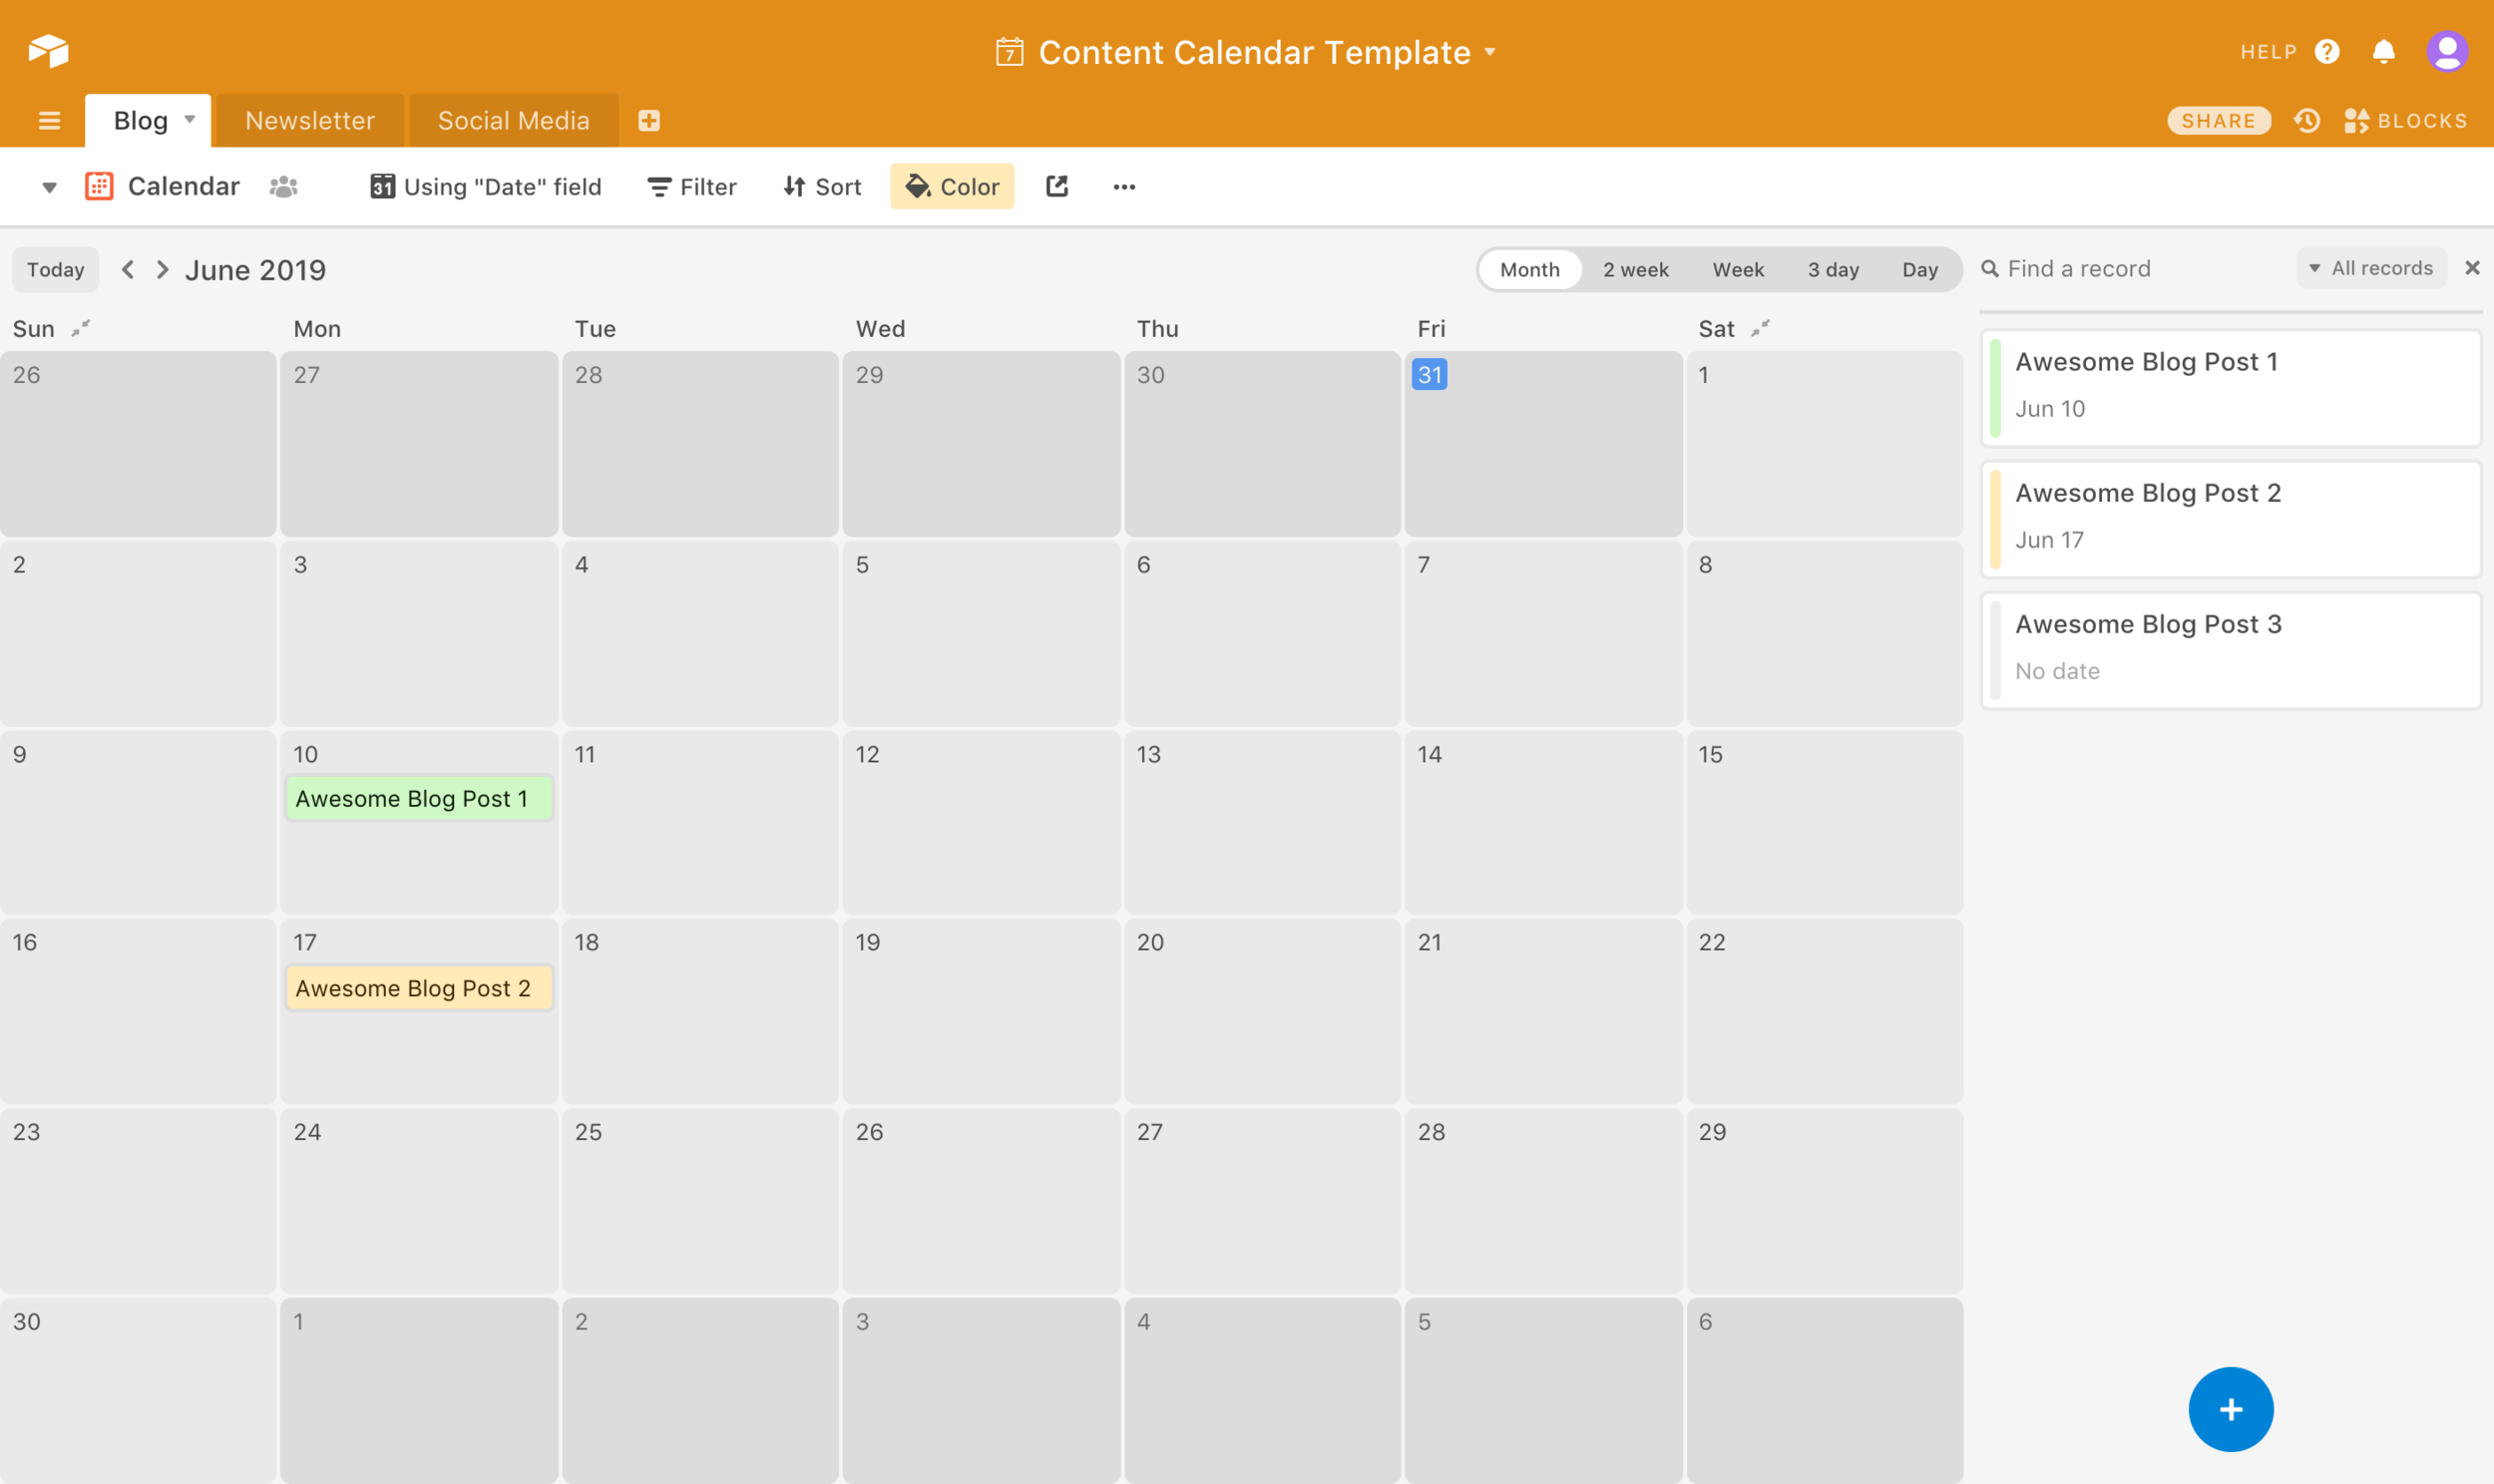
Once in the calendar view, sort by the Date field we added in Step 1 above.
I color code our records for easy “at-a-glance” viewing—here they’re specifying workflow status, to let us know which posts are in progress, completed, etc. You can also color code records by blog category to get a visual glimpse of how well represented the different categories are in a given month; or, they can be customized by author or by any other field in your table.
In the right-hand search bar, I set our list to “records without dates,” which allows me to see a running list of unscheduled posts. (This is where I store blog post ideas and review them when building out specific content calendars for each month.)
Drag items around the calendar, or between the calendar and record list on the right.
Clicking on a record and “expand record” provides access to all of the fields that were added in the grid view. This is where I keep notes on blog post ideas as I’m working with them—details to be included in the post, resources to share, etc.
You can also view your content in a Kanban (card-based) view. This is typically most useful for sorting by workflow status to monitor which posts are in progress, ready for review, published, etc.

3. Set up your content marketing plan
Within the Airtable base, you can also connect your blog content calendar to another calendar for content marketing.
Typically, for my businesses, our content marketing includes email marketing via newsletters and other email promotions, but you could also use a similar strategy to connect your blog content to other forms of marketing (social media, paid advertising, etc.)—just simply copy this template and adapt for those marketing types.
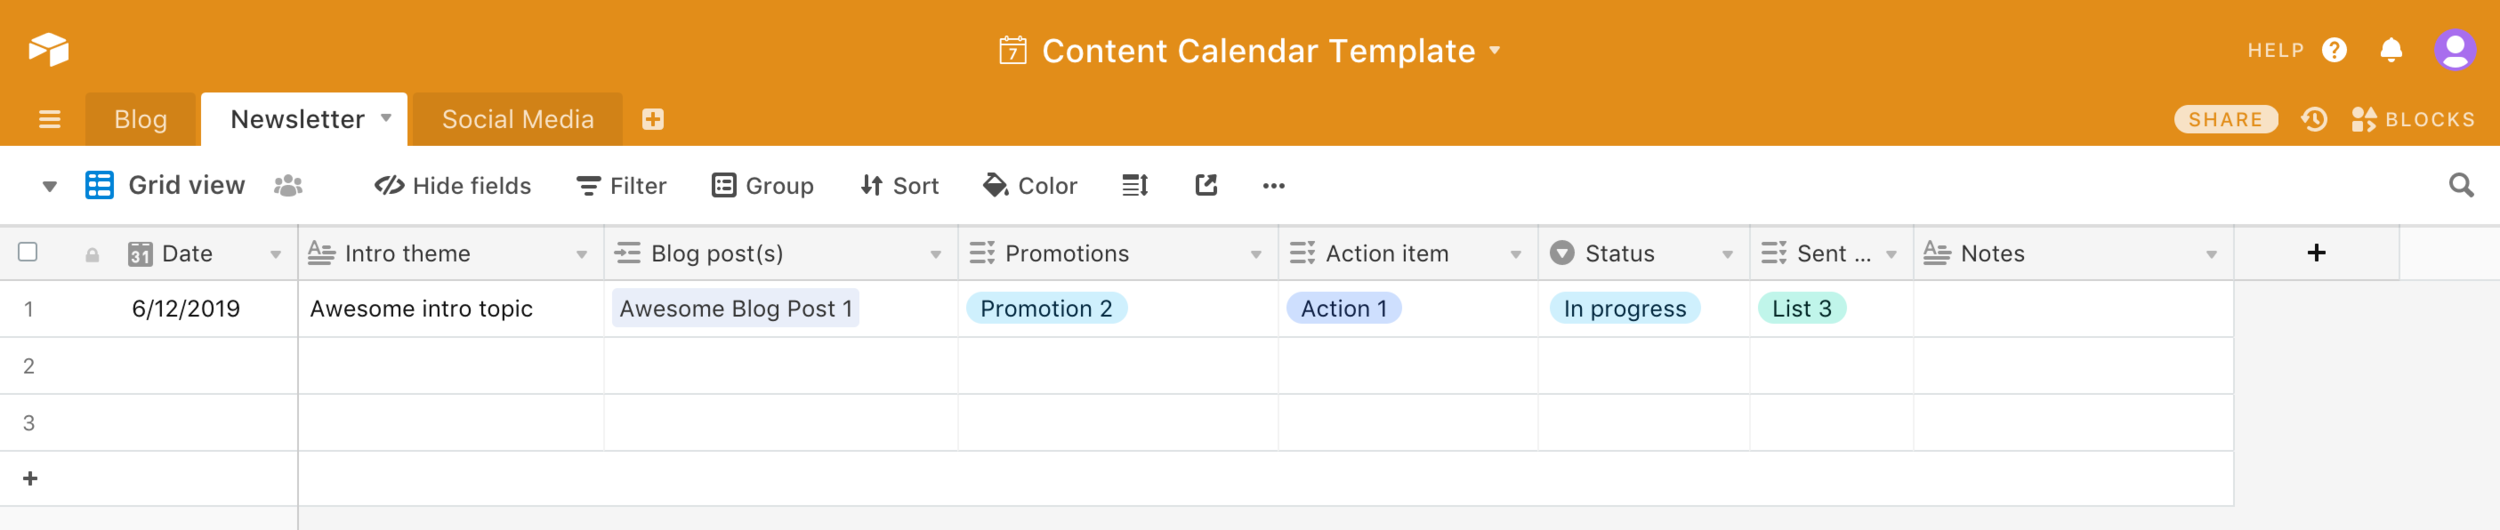
To set up our content marketing calendar, just add a new tab (“Newsletter”) with the following fields (the field type for each item is noted in italics):
DATE: The date the newsletter will send. Date
INTRO THEME: My newsletters include introductory remarks, so this field is a brief note about what I’ll write in the intro section for a given newsletter. Long text
BLOG POSTS: Here I’ll reference specific blog posts (from our “Blog” tab) that we’ll be highlighting in the newsletter. Link to another record
PROMOTIONS: Similar to how I outlined promotions in our blog posts, I’ll outline the offers or promotions I’d like to share in each newsletter. Multiple select
STATUS: Track the status of the newsletter (for example: concept, in progress, sent). Single select
SENT TO: This is useful for getting a quick glimpse of who you’ve sent each campaign to (if you manage multiple lists or segment your list). Multiple select
NOTES: Any notes to yourself in planning for the newsletter. Long text
Once your newsletter tab is set up, you’ll see the “Newsletter” field appear in your Blog tab (which we passed over in Step 1).
A note on social media calendars: Though Airtable is my favorite tool for managing blog and newsletter content calendars, I actually wouldn’t use it to manage social media content—there are plenty of other more specialized (and equally robust!) tools for each social media platform.
However, I’ve included a “Social Media” tab in the content calendar template if you’d like to use Airtable to track which platforms your blog content has been scheduled to.
4. Use your content calendar to grow your blog
Alright, now that we have the structure all set up, this is how I tend to use a content calendar like this in practice:
I work off of the Airtable desktop app.
I keep my Airtable “base” open to the Blog tab, in calendar view.
As needed, I add content ideas or make notes on existing content.
Monthly, I plan our upcoming blog content by adding and dragging content around the calendar. I personally aim to have a set calendar one month in advance and a loose calendar two months out—but these timelines can vary depending on the size of your business, how many writers you’re coordinating, etc.
As needed, I open records to add notes or edit record information (for example, moving workflow status to “published”).
Ready to create your own content calendar with Airtable?
Sign up for your free Airtable account and click “copy base” on any of the images above!

Grow your business & brand with content your audience loves!
Grab my free Blog Post Checklist:


