How to Grow Your Website with Pinterest
Pinterest is one of my absolute favorite strategies to grow your website traffic, audience and, ultimately, your business.
Though it’s sometimes mistakenly thought of as a social media platform, Pinterest is really a visual search engine. It helps people find specific content they’re looking for.
I absolutely recommend Pinterest as part of most businesses’ marketing strategy—especially if you’re a new business just starting out and looking to build a new audience.
One of the reasons I so heavily recommend blogging to grow your website traffic is that it allows you to produce relevant content that can be promoted on Pinterest to connect new audiences to your business.
How Pinterest can help grow your business
Promoting your business’ content on Pinterest can have a significant impact in growing your business by:
sharing helpful and valuable content with people who are looking for just that (aka, attracting your ideal customers!)
expanding your reach to new audiences
establishing your business as an industry expert
building trust and rapport with your audience
growing traffic to your website (which also helps to boost SEO!)
Now, if your business is already on Pinterest, these outcomes can be accomplished simply by sharing your relevant blog post or freebie opt-in gift content on the Pinterest platform.
But if you’d like to build your audience more quickly or expand your reach even further, there are a few other tools and tips I recommend to maximize your impact on Pinterest.
This post contains affiliate links through which I may earn a commission if you choose to purchase, at no additional cost to you. As always, these are products or services I personally use & love!
How to grow your website traffic with Pinterest
Here are my top tips for optimizing your Pinterest account and strategy to share your blog content and send interested traffic to your website:
1. Set up your Pinterest business account & rich pins
First, if you’re using Pinterest for your business, I recommend setting up a free Pinterest business account and activating “rich pins.”
Rich pins pull information from your website metadata into Pinterest.
For example, when you share a pin linked to one of your blog posts, the rich pin will automatically be titled with your blog post title and include your blog post excerpt that you’ve set up in Squarespace.
(You can still write a Pinterest-specific caption, which we’ll cover below, so this blog post excerpt is essentially extra information that gets to come along with your pin, helping to boost its Pinterest SEO.)
Not only do Pinterest rich pins make your life easier in that your pin is already labeled and captioned with useful information (keywords!), but Pinterest also ranks rich pins higher in search results.
2. Perfect your Pinterest SEO
Just like other search engines, Pinterest uses the information associated with your pin to determine its ranking in users’ search results.
With this in mind, you’ll want to strategically craft each of your pins to be sure it’s optimized to perform well in Pinterest’s search algorithm.
What the Pinterest algorithm looks for
There are few things Pinterest is looking for when they choose which relevant pins to share in a given search query:
pin title + description
rich pin metadata (blog post title, post excerpt)
pin “quality” (how well has it been received by those who’ve viewed it?)
pinner “quality” (do you pin regular, quality content?)
link content (is the content on the page you’re linking to relevant to the search terms?)
How to craft SEO-rich pins
That means, to perform well in Pinterest search result rankings, you’ll want to:
Be sure your pins are set up as rich pins.
Write a keyword-rich pin title and description that uses actual terms people search for on Pinterest (a simple search in the Pinterest search bar will offer you popular search terms for that topic).
Pin to relevant boards and groups that actually want to engage with your content.
Pin regular, quality (i.e. relevant) content to your own boards.
Be sure you’re accurately promoting your pins—any keywords you use in your description should match keywords actually used in your blog post.
3. Create professional-looking pins
Now, let’s chat about actually creating your pins!
Whether you use professional design software, or a more user-friendly (and free!) platform like Canva, it’s essential that you create clear, professional, on-brand pins that:
clearly express the content of your link
entice viewers to learn more by clicking through to your website
establish and enhance your brand identity
Though pins can be various sizes, Pinterest recommends sticking to 1000x1500 pixels, which it even prioritizes in its search results.
Canva is free design software for “non-designers.” With it, you can design branded Pinterest pins, as well as logos, social media imagery, PDF handouts, presentations & more.
I recommend using design software like Canva, which has a huge collection of properly-sized pin templates you can build off of to create your own branded pins.
Here are just a few examples of their Pinterest templates that can be customized for your brand and specific blog post:
Design Tip: Canva Pro is worth it
With Pinterest marketing, you’ll be creating a lot of pins over time—so even though Canva offers a free plan that’s perfectly sufficient for creating nicely branded pins, I generally recommend upgrading to Canva Pro.
Besides offering more design options, the main reason Canva Pro is so beneficial is that it allows you to save your own Brand Kit with your business logo, colors and fonts, to easily create new pins down the road.
So, Canva Pro makes your pin-creating assembly line much more efficient. 👍
4. Manage your pins with Tailwind
Now, here’s my absolute biggest Pinterest tip:
Tailwind, the industry’s best Pinterest scheduling tool and community.
(Psst, here’s how to get a free trial of Tailwind to try it out!)
There are many, many benefits of using Tailwind to promote your pins on Pinterest, and I recommend it to anyone looking to grow your website (and business) audience via Pinterest.
Benefits of using Tailwind for Pinterest management
Here are some of my favorite Tailwind features that will make your Pinterest promotion easier, more streamlined and more effective:
Batch schedule your pins
First of all, batch scheduling your pins is a great strategy to save time and efficiently promote your content on Pinterest—without hanging out there all day.
But just like other search engines, Pinterest uses algorithms to rank pins in search results, and they give more priority to pinners (accounts) that pin regularly than to those who pin a bunch of content all at once.
Ideally, you’ll be pinning 30+ times per day (that’s what I recommend for most businesses looking to grow their reach) and from the Pinterest algorithm’s perspective, it’s much better to do that at 30 different times than all at once. However, it’s certainly a much better use of your time to schedule those pins all at once than to manually post them at 30 different times throughout the day (yikes!).
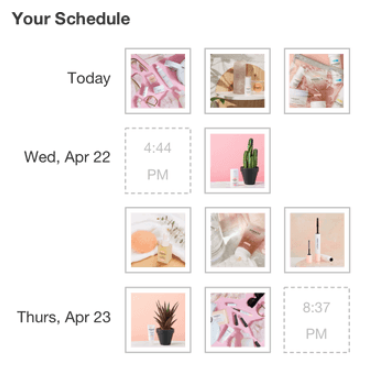
Tailwind allows you to easily batch schedule a queue of pins that will automatically post to Pinterest at their scheduled date/time.
image via Tailwind
Shuffle queue
For efficiency, you’ll want to batch schedule your pins, which includes two things:
Scheduling a bunch of your own pins in one sitting
Scheduling a bunch of curated content in one sitting
Note: For a growing business, I’d aim for about 30-50% your own content, and the rest curated content.
One of the features of Tailwind that is particularly useful for batch scheduling is the ability to shuffle your queue. So, if you batch schedule many pins from one source or on one topic (the most efficient way to search for curated content), you’re able to spread those pins out throughout your queue to give a more balanced user experience.
Schedule pins to maximize engagement
Another benefit of using Tailwind to schedule pins is that the app will help you create an optimized schedule, based on when your viewers are most likely to see and engage with your new content.
This is a simpler and more effective way to set a daily pinning schedule than randomly choosing your times or manually adjusting them with trial and error.
Repurpose your content with SmartLoop
Tailwind has a time-saving feature called SmartLoop that allows you to repurpose your existing content by adding your best pins to automated loops that re-pin to your account (within specified parameters).
This is a great way to keep your blog-promoting pins fresh and cycling through your boards, without having to continuously re-pin older content manually.
For example, we add our best pins promoting our entrepreneurship blog posts to our “Entrepreneurs” SmartLoop that re-shares one of these older pins to our “Entrepreneur Tips” board each week.
See my guide for setting up SmartLoop for your Pinterest promotion.
image via Tailwind
5. Grow faster with Tailwind Tribes
Last, but certainly not least, my favorite benefit of Tailwind is the ability to join pinner groups called Tailwind Tribes.
These “Tribes” are communities of like-minded pinners (usually businesses or entrepreneurs) who get together to share and promote each other’s content. There’s usually a 1:1 sharing rule, meaning: you submit one piece of your content to the group and re-pin one piece of someone else’s content they’ve shared to the group.
This is both a simple and efficient way to connect with relevant content you can curate on your own account, as well as to get your own content in front of people who are specifically there to promote it as well. Win-win!
image via Tailwind
If you’re interested, here’s my guide on getting started with Tailwind Tribes.


