How to Add Custom Font to Your Squarespace Website
Squarespace has over a thousand fonts you can choose from and use on your website.
That’s a lot! And it gives you the ability to choose a font (or a combination of fonts) that best matches your business branding and aesthetic.
But, sometimes you’d like to use a specific font that’s not one of those options.
→ Perhaps your business has existing branding that uses a font not available on Squarespace.
→ Or, maybe you’re looking for particular font style you’re just not finding there. (This is common for script or “handwriting” fonts, which are a little hard to come by in the Squarespace built-in fonts.)
The best sources of custom fonts for your website
The Squarespace style editor pulls in Google and Adobe fonts, giving you quick and easy access to use those fonts on your website—free, and with one simple click.
That’s the simplest and easiest way to update fonts on your Squarespace website.
But, if you’re not finding what you’d like among Squarespace’s built-in options, there are several other sources for browsing even more custom fonts that can be added to your Squarespace website too:
Font Squirrel is a helpful database of free custom fonts. You can also search by web font license—more on that below!
Creative Market is my favorite source for custom fonts in general, and script font specifically. They have thousands of fonts available, including an extensive collection of brush fonts and script fonts. It’s my most-used source for custom web design and branding.
This post contains affiliate links through which I may earn a commission if you choose to purchase, at no additional cost to you. As always, these are products or services I personally use & love!
How to add a custom font to your Squarespace website
Once you find a custom font you like, adding it to your Squarespace website is relatively easy!
Adding a custom font to Squarespace does require some CSS (aka “custom code”), so standard disclaimer here that you should only add custom code to your website if you feel confident with that process. However, there are just a few simple copy/paste steps, so this is an easy customization, even for beginners.
Here are the 5 steps to adding custom font to your Squarespace website!
1. Choose your font
The very first step is choosing your custom font! (Or, if you already have a font in mind, ensuring you have the proper font files and licensing.)
Fonts are creative property—meaning, they’re not all free to use however you want.
Of course, any of the fonts available through Squarespace’s font editor are available for your use, for free, anywhere on your website.
But, to legally use a non-Squarespace-generated custom font on your website, you just need to be sure you have the rights to do so.
Fortunately, if you purchase your custom font through a legitimate source like Creative Market, you can be sure to purchase the appropriate web font licensing to use that font on your website.
2. Prepare your web font files
To add custom font to your website, we’ll need three different font files:
.ttf or .otf
.woff
.woff2
If you purchase a custom font for use on your website, it likely will come with web font files (in which case you can skip this step).
But, if you have rights to use a font on your website but it didn’t come with web font files, you can convert them online with a tool like this free Web Font Generator. Simply upload your .ttf or .otf font file and it will generate the .woff and .woff2 files for you.
When you’ve got these three font files ready (.ttf or .otf + .woff + .woff2), you can move on to Step 3!
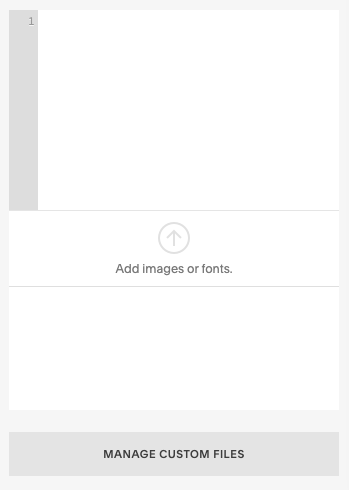
3. Upload your font files to Squarespace
To upload your font files to your Squarespace website, head to Design > Custom CSS > Manage Custom Files.
Click the Add images or fonts upload button and add your three font files listed above.
4. Name your custom font in Squarespace
Once your fonts have been uploaded, we’ll add some code to tell Squarespace “Hey, here’s my new font, and this is how I want you to use it.”
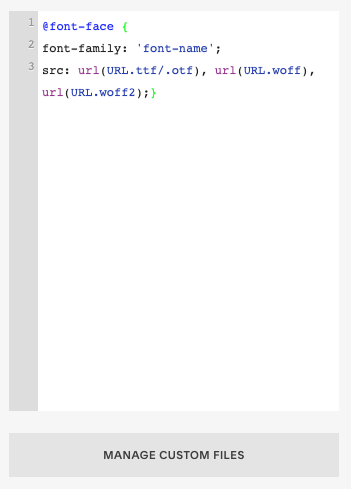
In your Squarespace CSS Editor, add this code:
@font-face {
font-family: 'font-name';
src: url(URL.ttf/.otf), url(URL.woff), url(URL.woff2);}
Here’s how it should look in your CSS Editor:
Then, update these parts of the code with your specific font information:
Font name
Replace ‘font-name’ with… you guessed it—your font name!
Example: If your font is called My Awesome Font, you’d replace that placeholder text with something along the lines of ‘my-awesome-font’
This name is just for your internal use, it can be whatever you’d like, so feel free to simplify a longer font name, or use whatever makes most sense for you.
Also note that you should use hyphens between words if your font has multiple words.
Font URLs
You’ll also update the URL parts of this code with the specific URLs of the font files you just uploaded.
The easiest way to do this is to highlight the part you’ll be replacing (everything between the parentheses, e.g. URL.tff/.otf), delete that placeholder text, then click Manage Custom Files and click the applicable font you need the URL for (in this case, your .ttf or .otf file).
So, here’s an example of what that code snippet above should look like when you’re done updating it with your font’s specific information:

5. Define where & how the custom font should be used
And, finally, we’ll just need to tell Squarespace where you’d like this custom font used on your website.
There are two different ways to use custom fonts throughout your Squarespace site:
Heading styles
Specific site elements (like newsletter blocks, summary blocks, buttons, etc.)
Here’s how to assign your custom font to each of these:
Using custom fonts in your Squarespace heading styles
You can assign your new custom font to a specific heading style in Squarespace. For example, perhaps you’d like all your Heading 1 text to be your new fancy font.
In your CSS Editor, you’ll add this code:
h1 {
font-family: 'font-name';}
You’ll replace ‘font-name’ with whatever you’ve named your custom font above.
You can now use your Squarespace Site Styles editor to adjust other aspects of this font—size, color, capitalization, letter spacing or line height, etc.
Using custom fonts for specific Squarespace elements
You can also assign your new custom font to other parts of your site—like your newsletter block heading or summary block titles. (Essentially anything you know how to find the class identifier for!)
For example, if you wanted to update your blog post titles to your new custom font, you’d add this code to your Squarespace CSS Editor:
.BlogItem-title {
font-family: 'font-name';}
Almost any text on your Squarespace website can be styled in your custom font. 🙌
Using custom fonts on your website
Now that your custom font is uploaded to Squarespace and assigned to the places you’d like it around your site, you can use your custom font with whatever heading style(s) or other identifiers you’ve assigned it to!
Happy Squarespacing!

Create a professional website to grow your business & brand
Get my free checklist for optimizing your Squarespace website: